Educational
Stop losing sales to imagination gaps. Learn how different types of 3D rendering and modeling techniques can help buyers visualize homes and close deals faster.

When people search for the different types of 3D rendering, the results often lean heavily into technical rendering methods: ray tracing, rasterization, real-time rendering, path tracing, and rendering engines.
That information is useful if you are comparing software or learning computer graphics. But for builders in the tiny home, ADU or Granny Flat, prefab, and modular home building industry, the more practical question is usually simpler:
Which type of render do I need, and where should I use it?
A render for an Instagram post does not need to do the same job as a proposal cover. A wide exterior image for a website hero section will not always work as a vertical Facebook ad. An interior render that shows layout flow serves a different purpose from a close-up render of cabinetry, benchtops, or fixtures.
This guide breaks down the practical types of 3D rendering small home builders are most likely to use, including exterior renders, interior renders, aerial views, common camera angles, and image formats for websites, social media, proposals, brochures, and ads.
The goal is not to turn every builder into a rendering technician. It is to help you choose the right visual for the right job.
This matters because home research is already heavily visual and digital. In the National Association of REALTORS® 2024 Profile of Home Buyers and Sellers, 43% of buyers said their first step was looking for properties online, while 69% used a mobile or tablet device during their search. The same report found that 41% of buyers considered photos very useful, 39% valued detailed property information, and 31% valued floor plans.
For builders, the takeaway is simple: buyers are already using visual information to decide what is worth investigating further. A 3D render does not replace good design, pricing, specifications, or sales follow-up, but it can make the design easier to understand before the buyer books a call or opens a proposal.
3D Modelling vs Rendering: What Builders Actually Need to Know
Before looking at the different types of 3D rendering, it helps to understand the difference between 3D modelling vs rendering. You may also see this written as 3D modeling vs rendering, especially in US-based sources.
In simple terms, 3D modelling is the process of creating the digital structure of a design. For a small home, that could include the shell, roof form, windows, doors, interior walls, cabinets, lofts, stairs, furniture, and other design elements.
3D rendering is the process of turning that model into a finished visual image or animation. It adds the layer buyers actually see: materials, textures, lighting, camera angle, environment, weather, season, and overall mood.
Chaos explains the difference clearly: 3D modelling produces a digital 3D model, while rendering generates 2D images or animations that represent that model visually.
For builders, the difference matters because each one supports a different part of the workflow:
The 3D model helps you design, adjust, and communicate the structure of the home.
The 3D render helps clients understand what the finished home could look and feel like.
The render format determines where that visual will work best, such as a website, social media post, proposal, brochure, or ad.
There are many technical types of 3D rendering techniques, including real-time rendering, ray tracing, path tracing, and AI-assisted rendering. But for small home builders, the more useful way to think about render types is by purpose: what the image needs to show, where it will be used, and what question it helps answer for the buyer.
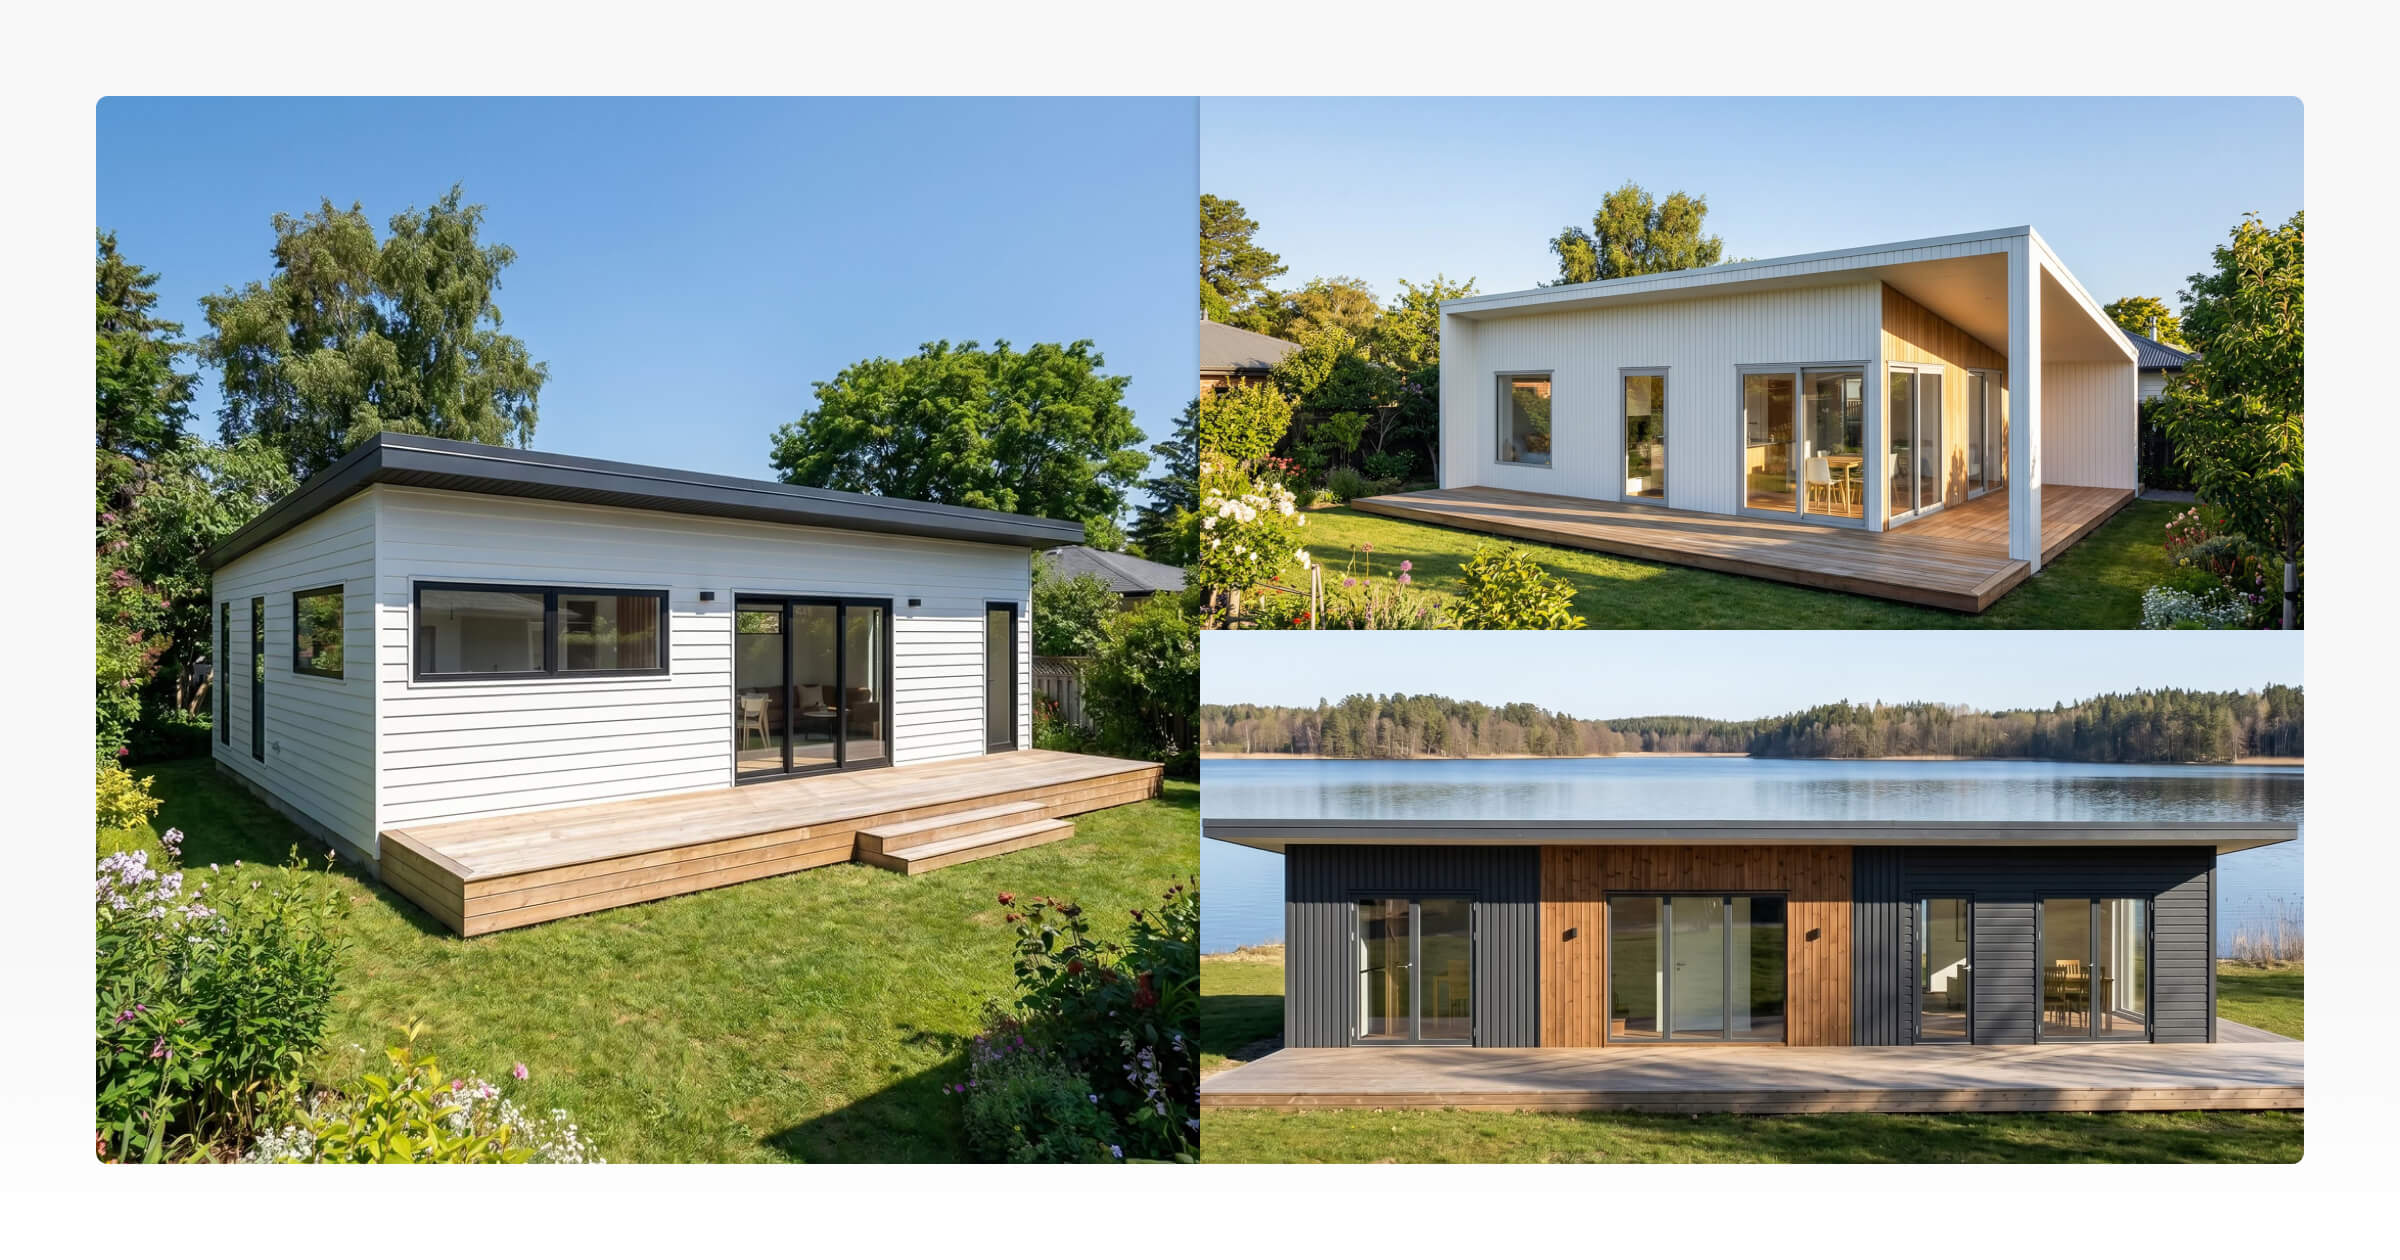
Exterior 3D Renders for First Impressions and Overall Design Style
Exterior renders show the outside of the home. For most builders, this is one of the most important architectural rendering types because it is often the first polished visual a buyer sees.
A strong exterior render can show the shape of the home, roofline, cladding, windows, entry, deck, trailer (if a tiny house on wheels), foundation, landscaping, and surrounding environment. It helps someone understand the overall style before they get into floor plans, materials, pricing, or build details.
ArchiCGI describes exterior rendering as one of the main types of architectural rendering used to present a design visually before it is built. For builders, that makes exterior renders especially useful for early-stage marketing and sales materials.
There is also broader property marketing data that supports the value of strong visuals. A Redfin study comparing professional DSLR listing photography with amateur point-and-shoot photos found that professionally photographed homes priced between $200,000 and $1 million sold for $3,400 to $11,200 more relative to their list prices. For homes in the $400,000 range, professionally photographed homes sold 21 days faster. The same study found that the sharpest 10% of listing photos sold at or above list price 44% of the time, compared with 13% for photos of average sharpness.
While there are many technical types of 3D rendering techniques used behind the scenes, such as real-time rendering, ray tracing, and path tracing, most builders do not need to focus on the underlying technology. What matters is whether the exterior render clearly communicates the design and helps buyers picture the finished home.
Exterior renders are best used for:
Website hero images
Design listing pages
Facebook and Instagram ads
Brochures and downloadable PDFs
Proposal covers
Model range previews
Social media launch posts
Email marketing graphics
For small homes, exterior renders should be clear rather than over-styled. Buyers usually need to understand the shape, proportions, entry, window placement, materials, and setting. If the render is too dramatic, too dark, or too cropped, it can look polished while still failing to explain the design.
A good exterior render should answer questions like:
What does the home look like from the outside?
What style does it suit: modern, rustic, coastal, cabin, farmhouse, minimalist?
How large or compact does it feel?
Where is the entry?
How do the roofline, windows, and cladding work together?
Would this design fit the buyer’s lifestyle or property?
For website headers and proposal covers, landscape renders usually work best because they give the home enough horizontal space. For Instagram or Facebook feed posts, a portrait crop may work better because it uses more vertical screen space on mobile.
The key is to plan the final use before creating the render. A beautiful wide exterior image may look excellent on a website, then lose half the roofline when cropped into a social post.
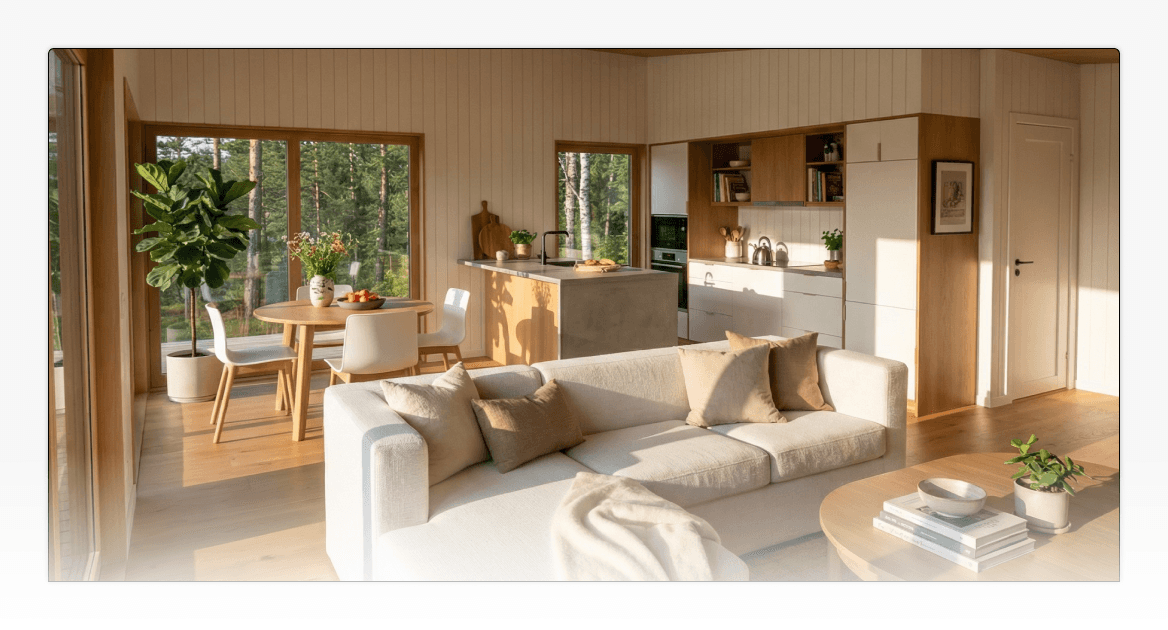
Interior 3D Rendering for Small Homes: Layout, Light and Liveability
Interior renders show the inside of the home. For compact spaces, they are often more important than builders realize because buyers are not only asking, “Does it look good?” They are asking, “Could I actually live here?”
This is where 3D rendering for small homes becomes more specific than general real estate rendering. In a tiny home, ADU, cabin, or compact prefab home, every part of the interior has to work harder. Storage, circulation, ceiling height, window placement, kitchen layout, furniture, stairs, lofts, and built-ins all affect whether the space feels practical.
Interior renders help buyers see:
How the kitchen connects to the living area
Whether the bedroom feels comfortable
How much natural light the space gets
Where storage is built in
How stairs, ladders, or lofts fit into the layout
What finishes, cabinetry, fixtures, and benchtops look like together
Whether the space feels cramped, open, warm, minimal, or premium
Adobe Substance 3D explains that 3D tools can create, texture, and render 3D assets and scenes, which is exactly what matters in interior renders: materials, surfaces, lighting, objects, and composition all affect how the final space is understood.
For small homes, there are two interior render types worth planning:
Wide interior renders
Wide interior renders show the relationship between areas. For example, they can show how the kitchen, lounge, dining nook, stairs, and hallway work together in one view.
These are useful for proposals, client presentations, website galleries, and design approval conversations.
For 3d rendering for small homes, wide interior views are particularly valuable because they help buyers understand how compact spaces function and connect. When creating wide interior renders, it is important to choose a field of view that represents the space accurately. A moderately wide perspective can help show how rooms connect and how the layout functions, while an overly exaggerated perspective may make the space appear larger than it will feel in reality. Accurate proportions help set realistic expectations and build trust with buyers.
Detail interior renders
Detail renders focus on smaller design moments. These could include cabinetry, joinery, shelving, stairs, fixtures, tapware, tiles, appliances, benchtops, feature walls, or built-in storage.
These are especially useful when you want to show craftsmanship, upgrades, material options, or premium finishes. A detail render can help justify why one option costs more than another because the buyer can see what changes visually.
This is also a practical example of 3d modelling vs rendering in action. The 3D model contains the cabinetry, fixtures, and built-in elements, while the render brings those details to life with realistic materials, textures, lighting, and finishes that buyers can evaluate.
For small home builders, interior renders are not just decorative. They reduce uncertainty around layout, storage, materials, and everyday use.
Aerial and Bird’s-Eye Architectural Rendering Types for Site Context
Aerial renders and bird’s-eye views show a home from above. For ADUs, cabins, backyard homes, modular dwellings, and small homes on rural or lifestyle blocks, this render type can be extremely useful because it shows placement.
A ground-level exterior render shows what the home looks like. An aerial render shows how it relates to the land around it.
Among the many types of 3D rendering techniques available to builders and designers, aerial rendering stands out because it provides context that is difficult to communicate from ground level alone.
Chaos describes aerial architectural rendering as a way to show architectural projects from above, including wider spatial relationships and surrounding context.
For small home builders, aerial renders can help show:
How an ADU sits behind or beside a main dwelling
How much yard space remains
Where the entry path, driveway, deck, or outdoor area sits
How the home relates to trees, fencing, neighbouring structures, or landscaping
How a cabin sits on a rural section
How multiple modular or prefab units could be arranged
How the home connects to outdoor living areas
This is especially useful for ADU and granny flat builders because buyers often need to understand how the unit fits into an existing property. Aerial renders can also support early sales conversations where the client is still trying to picture what is possible.
That said, an aerial render should not be presented as proof of planning, zoning, or permit compliance. It is a visual communication tool. If a builder needs to show compliance, the render should be supported by proper drawings, site plans, planning advice, and the relevant approval documentation.
Used correctly, aerial views help buyers understand the relationship between the home and the site. Used carelessly, they can create expectations the project has not yet proven.
3D Render Shot Types: Wide, Close-Up, Low Angle and High Angle
Once you know the type of render you need, the next decision is the camera angle.
Across different architectural rendering types, the way a scene is framed can have a major impact on how buyers interpret the design. Two renders of the same model can communicate completely different things depending on how the shot is framed. This is why shot type deserves its own place in a builder’s rendering workflow.
Wide-angle renders
Wide-angle renders show more of the home or room in a single image. They are useful for exterior hero images, full interior views, open-plan layouts, and spaces where the buyer needs to understand how different areas connect.
Wide-angle renders are especially valuable for small homes because they help buyers understand layout flow and how compact spaces function. This is one of the key strengths of 3D rendering for small homes, where showing the relationship between spaces is often just as important as showing the finishes. Buyers can see where the kitchen ends, where the lounge begins, how the stairs fit, and how storage is built into the space.
The main risk is distortion. If the camera is too wide, the space may look larger than it actually is. For compact home sales, clarity is better than exaggeration.
Close-up renders
Close-up renders focus on detail. These are useful for showing materials, fixtures, joinery, handles, cabinetry, tapware, benchtops, lighting, wall linings, stairs, shelving, and finishes.
They work well for:
Upgrade packages
Social media posts
Brochure details
Proposal pages
Website galleries
Material selection conversations
Close-up renders are especially useful when your point of difference is craftsmanship. They help buyers notice details that may be lost in a full-room view. They also highlight the practical difference in the 3D modelling vs rendering process: the model contains the design elements, while the render presents those elements with realistic materials, lighting, and visual detail that buyers can evaluate.
Low-angle renders
A low-angle render places the camera slightly below the subject and looks upward. Among the different types of 3D rendering shot styles, this approach can make a small home feel more grounded, architectural, or premium.
This angle works well for exterior renders where you want to emphasize height, roofline, cladding, entry features, or a strong facade. It is often used alongside other types of 3D rendering views to give buyers a stronger sense of the home's presence and design character.
Use it carefully. If the angle is too extreme, it can feel unnatural or overly dramatic. A slight low angle often works better than a theatrical one.
High-angle renders
A high-angle render looks down into the design. This can be useful for compact interiors because it helps the buyer understand layout, circulation, and the relationship between zones. Among the different architectural types of renders used in residential design, high-angle views are particularly effective for explaining how smaller spaces function.
High-angle shots are especially helpful for:
Kitchens
Living areas
Loft layouts
Storage-heavy interiors
Small bathrooms
Open-plan ADUs
Furniture placement
A high-angle render does not replace a floor plan, but it can make the floor plan easier to understand and help buyers compare different architectural types and layout options more confidently.
Eye-level renders
Eye-level renders feel closest to how a person would actually experience the home. These are often the most natural views for exterior and interior marketing because they place the buyer at human scale.
In 3D rendering for small homes, eye-level perspectives can be especially effective because they help buyers judge proportions, ceiling heights, storage solutions, and how the space might feel in everyday use.
For most builders, a balanced render set will include a mix of eye-level views, wide shots, detail shots, and at least one angle that explains layout or site context.
3D Render Formats for Websites, Social Media, Proposals and Ads
Render format matters because the same image will not work everywhere.
A landscape render might look excellent across a website banner, but crop poorly on Instagram. A portrait render might perform well in a mobile feed, but feel awkward on a proposal cover. A square image might suit a gallery grid, but lose impact as a hero image.
This is where many builders lose time. They create one good render, then try to force it into every channel.
It also highlights an important point in the 3d modelling vs rendering conversation. The 3D model provides the design foundation, but the render needs to be created with its final use in mind. Even a well-built model can produce less effective marketing visuals if the render format is not planned for the platform where it will appear.
A better approach is to plan the render format before generating the image.
Use Case | Recommended Format | Best Render Types | Why It Works |
|---|---|---|---|
Website hero section | Landscape, 16:9, 3:2, or custom website crop | Exterior render, aerial render | Gives the home room to breathe and works well across desktop layouts |
Website gallery | Square, 4:5, or mixed ratios | Exterior, interior, detail shots | Creates a consistent visual library for buyers to browse |
Proposal cover | Landscape or 5:4 | Exterior render, aerial render | Feels polished and gives enough space for the design and branding |
Proposal interior pages | Portrait, 4:5, or 5:4 | Interior renders, detail shots | Works well in PDF layouts where images sit alongside notes, specifications, or pricing |
Instagram feed | 4:5 or 1:1 | Exterior, interior, detail shots | 4:5 uses more vertical space in the feed, while 1:1 works well for grids |
Facebook feed | 4:5 or 1:1 | Exterior, interior, promotional renders | Useful for mobile-first posts and ads |
Stories, Reels and TikTok | 9:16 | Vertical exterior, vertical interior, walk-through style crops | Designed for full-screen vertical viewing |
2:3, such as 1000 x 1500px | Interior renders, design inspiration graphics | Pinterest recommends this ratio for standard Pins | |
Brochures | Landscape, portrait, or 5:4 depending on layout | Exterior, interior, aerial and detail renders | Supports both full-page feature images and smaller supporting visuals |
Listing thumbnails | 1:1 or 4:5 | Strong exterior render | Keeps design cards tidy and consistent |
For social media, use official platform guidance where possible. Meta notes that both 1:1 and 4:5 are supported for Feed placements, with vertical 4:5 recommended for single-image ads. Pinterest recommends a 2:3 aspect ratio, such as 1000 x 1500 pixels, for standard image ads.
The practical takeaway is simple: do not wait until the render is finished to think about cropping.
Before generating a render, decide where it will be used. If the image needs to work across multiple channels, keep important parts of the home away from the edges. This gives you more flexibility when cropping for website banners, proposal pages, social posts, and ads.
For small home builders, a useful render set might include:
One landscape exterior render for the website and proposal cover
One portrait exterior or interior render for Instagram and Facebook
One square crop for galleries, carousels, or listing cards
One aerial render for site context
One or two interior renders for layout clarity
One or two close-up detail renders for materials, upgrades, or craftsmanship
That set will usually do more useful work than one highly polished image with no clear destination.
Creating Different Types of 3D Rendering with Tiny Easy
Once builders understand the different types of 3D rendering, the next challenge is creating them without turning every visual into a separate project.
This is where Tiny Easy fits naturally into the workflow.
Tiny Easy’s AI Render Tool is built for tiny home builders who want to create marketing-ready exterior and interior renders from their 3D designs. Instead of treating rendering as something disconnected from the design process, the render starts with the design already created inside the 3D Designer.
That matters because one 3D design can support multiple visual outputs. Whether you are creating exterior views, interior scenes, aerial perspectives, or other types of 3D rendering techniques, the same underlying design can be reused across multiple marketing and sales assets.
A builder could use the same design to create:
An exterior render for the website
An interior render for the proposal
A close-up material render for social media
A wide-angle layout render for a sales conversation
A portrait crop for Instagram or Facebook
A landscape image for a brochure or proposal cover
Tiny Easy’s broader visual sales workflow also combines AI renders, 3D walkthroughs, sales plans, and proposal-ready visuals. The Tiny Easy homepage describes how builders can bring designs to life with AI renders, 3D walkthroughs, and sales plans inside a branded proposal workflow.
This is useful for small home builders because render creation is often only one part of the sales process. Builders also need to explain layout, show options, present pricing, answer client questions, and make the next step feel clear.
A disconnected render can look beautiful, but still sit in a folder. A connected render can become part of a website, proposal, email follow-up, social post, design presentation, or client approval conversation.
That is the real value of planning render types properly. You are not just creating images. You are building a reusable visual library around each home design.
Key Takeaways
The main types of 3D rendering for small home builders are exterior renders, interior renders, aerial or bird’s-eye renders, detail renders, and format-specific renders for different platforms.
The difference between 3D modelling vs rendering is important because the model supports the design workflow, while the render supports communication, marketing, sales, and client understanding.
Exterior renders are best for first impressions, website visuals, brochures, proposal covers, ads, and model range previews.
Interior renders are especially useful for 3D rendering for small homes because they help buyers understand layout, storage, flow, finishes, and liveability in compact spaces.
Aerial and bird’s-eye views are useful architectural rendering types for ADUs, cabins, prefab homes, modular homes, and backyard dwellings where site context matters.
Shot types change what the buyer notices. Wide shots explain layout, close-ups show finish quality, low angles add presence, high angles improve spatial clarity, and eye-level views feel natural.
Render formats should be planned before the image is created. Landscape, portrait, square, 4:5, 9:16, 2:3, and 5:4 formats each suit different channels and layouts.
For builders, the most useful types of 3D rendering techniques are not always the most technical. The best render is the one that answers the buyer’s next question clearly.
Conclusion
The best 3D render is not simply the most realistic or polished image. It is the image that does the right job in the right place.
For small home builders, that means thinking beyond one hero image. Exterior renders help buyers understand the overall design. Interior renders explain layout and atmosphere. Aerial renders show site context. Detail shots highlight craftsmanship and upgrades. Format-specific renders make sure the same design works across websites, proposals, social media, brochures, and ads.
Once you understand the different types of 3D rendering, it becomes easier to plan visuals with purpose. Effective 3D rendering for small home projects is not just about creating attractive images. It is about helping buyers understand how a design looks, feels, and functions before construction begins. Instead of asking, “Can we make this look good?” the better question is, “What does this render need to help the buyer understand?”
That shift makes your visual workflow more useful, more consistent, and easier to reuse across the full sales process.
With Tiny Easy, builders can start from a 3D design and turn it into practical visual assets for marketing, proposals, and client communication. For small home businesses, that connected workflow is often more valuable than creating one beautiful render at a time.


About the Author
Eujenne | Co-founder of Tiny Easy and has 8+ years of experience in the tiny house and small home industry.
She built her own tiny home on wheels with her partner and co-founder Laurin, and has designed several popular Tiny Easy concept homes, including the Scandi, Petite Maison, and 10x10 Tiny House on Wheels. At Tiny Easy, Eujenne works across UI/UX, product education, content marketing, and builder resources, helping small home businesses use 3D design and visual sales tools to improve their design, sales, and client communication workflows.